If you notice mistakes, typos, bad english, wrong screenshots in the user guide (for TVPaint 10 only !) Please list everything here
Mistakes in the user guide
Mistakes in the user guide
Everything is in the title !
If you notice mistakes, typos, bad english, wrong screenshots in the user guide (for TVPaint 10 only !) Please list everything here
If you notice mistakes, typos, bad english, wrong screenshots in the user guide (for TVPaint 10 only !) Please list everything here
Re: Mistakes in the user guide
Apart from mistakes, my biggest issue is the accessibility. Right now it's quite hard to find the right information.
It would be nice if page 2 would just be the Index (right now it starts at 7). And it would also be easier if it would use pagenumbers instead of "3 - 10". Usually everything in the index is clickable in a PDF, which makes it much easier to navigate.
(You could take a look at Anime Studio Pro's PDF manual, it's a nice example and it's very easy to find what you're looking for in there)
- LukasKrepel.nl
- TVPaint Pro 11.7.5
- MacBook Pro i7 2018 macOS Sonoma 14.6.1 + PC Windows 10
- Wacom Cintiq 27QHDT + Wacom Intuos4
- YouTube.com/@ClubBaboo
- YouTube.com/@FrameOrder
Re: Mistakes in the user guide
Ok, thank you for reporting that.
You're right for the pages. We should also avoid the blank at the beginning and write the special thanks at the end
You're right for the pages. We should also avoid the blank at the beginning and write the special thanks at the end
- D.T. Nethery
- Posts: 4276
- Joined: 27 Sep 2006, 19:19
Re: Mistakes in the user guide
This is not a "mistake' per se , but I think the explanation of the Video Input function (aka "video grabber" in previous TVPaint versions) could be improved.
As it is now in section 5-12 - through - 5-14 describing the various functions of the Video Input panel such as frame grabbing , "Mix"/onion-skinning , Rotation, etc. the current user manual has screen captures of a very pretty young woman demonstrating these functions from a webcam (this is you, Elodie , yes ? ) , and while I enjoy looking at beautiful women very much I think this section of the current user manual looks more like a demonstration of video chat with Skype or something , rather than a demonstration of how to capture animation. It would be more practical for animation if this section was illustrated with examples of frame capturing pencil animation drawings with an HD webcam (Agent V5) mounted on a tripod , or other video down-shooter (Recordex Simplicity Cam 5e or new Simplicty Cam 5i) --
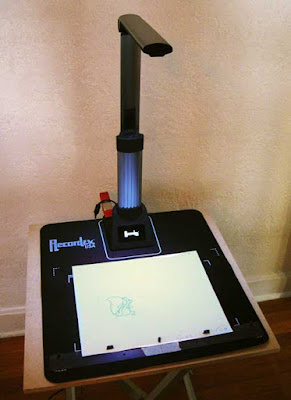
(but don't use this image because when I took this photo I had not yet added the side-lights , which are necessary to get clear video frame-captures. Also,
the Recordex Simplicity Cam 5e shown here has now been discontinued , replaced by the new Simplicty Cam 5i .)
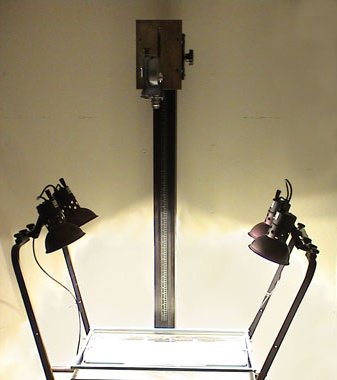
The lighting set-up for down-shooter should be something like this:


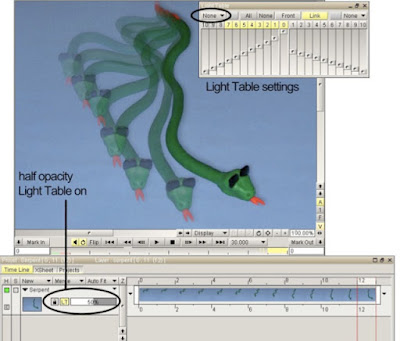
and also it would be good to include some illustrations showing how the Video Input function is used to capture Stop-Motion puppets or other stop-motion objects on a table-top shooting stage. (similar to the images of the stop-motion snake puppet shown at the end of the old TVPaint 9.5 user manual in section 18-10 - through - 18-12 under the Canon Plug-In ) . The explanation in the older 9.5 manual about how to enable the Light Table and drop down the Layer opacity to 50% while shooting stop-motion allows the user to see more of the previous frames was very valuable and it's too bad that explanation got dropped from the TVPaint 10 user manual.
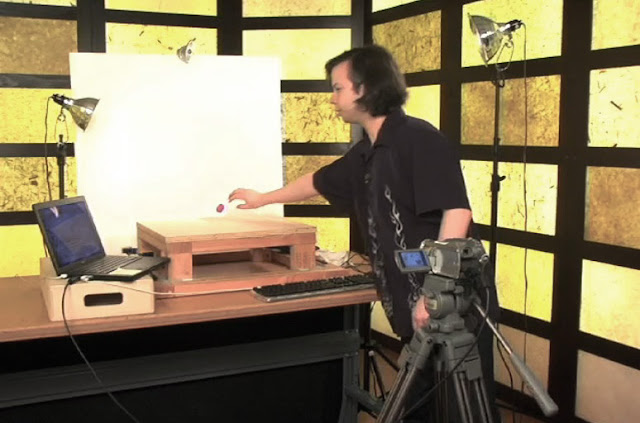
(the image of the animator shooting a stop-motion sequence is a screen-cap from an instructional video
at my school demonstrating how to shoot stop motion with TVPaint. This photo should not be used for the user manual, but something similar
would be appropriate. The camera shown in the demo photo is a Canon mini-dv which is no longer made, but a drawing or a photo showing
this kind of simple shooting set-up for stop-motion with a modern HD webcam, such as the Agent V5/V6 or the Logitech C-920 , mounted on a tripod, would be useful to have in the new user manual.)
It would be helpful to show how for stop-motion animation with TVPaint a webcam can be attached parallel to a DSLR camera for video assist to make live frame-captures directly to TVPaint which allows the animator to use the "Mix" (onion-skinning) function showing previously captured frames, so the animator may gauge how far a puppet or object needs to be moved on each subsequent frame , but at the same time the animator is also capturing each frame in HIGH-RESOLUTION with the DSLR camera, then after the stop-motion sequence is completed the high-res. images from the DSLR camera's memory card are transferred to the user's computer and then imported into a new layer in TVPaint (above the previously captured low-res. images from the webcam) , so the final output will be from the high-resolution images .

(don't use this image in the new user manual because I pulled it from the support webpage of another stop-motion application , but this gives the idea
of what I am talking about to show how a webcam can be attached alongside of a DSLR )
.
As it is now in section 5-12 - through - 5-14 describing the various functions of the Video Input panel such as frame grabbing , "Mix"/onion-skinning , Rotation, etc. the current user manual has screen captures of a very pretty young woman demonstrating these functions from a webcam

(but don't use this image because when I took this photo I had not yet added the side-lights , which are necessary to get clear video frame-captures. Also,
the Recordex Simplicity Cam 5e shown here has now been discontinued , replaced by the new Simplicty Cam 5i .)
The lighting set-up for down-shooter should be something like this:


and also it would be good to include some illustrations showing how the Video Input function is used to capture Stop-Motion puppets or other stop-motion objects on a table-top shooting stage. (similar to the images of the stop-motion snake puppet shown at the end of the old TVPaint 9.5 user manual in section 18-10 - through - 18-12 under the Canon Plug-In ) . The explanation in the older 9.5 manual about how to enable the Light Table and drop down the Layer opacity to 50% while shooting stop-motion allows the user to see more of the previous frames was very valuable and it's too bad that explanation got dropped from the TVPaint 10 user manual.


(the image of the animator shooting a stop-motion sequence is a screen-cap from an instructional video
at my school demonstrating how to shoot stop motion with TVPaint. This photo should not be used for the user manual, but something similar
would be appropriate. The camera shown in the demo photo is a Canon mini-dv which is no longer made, but a drawing or a photo showing
this kind of simple shooting set-up for stop-motion with a modern HD webcam, such as the Agent V5/V6 or the Logitech C-920 , mounted on a tripod, would be useful to have in the new user manual.)
It would be helpful to show how for stop-motion animation with TVPaint a webcam can be attached parallel to a DSLR camera for video assist to make live frame-captures directly to TVPaint which allows the animator to use the "Mix" (onion-skinning) function showing previously captured frames, so the animator may gauge how far a puppet or object needs to be moved on each subsequent frame , but at the same time the animator is also capturing each frame in HIGH-RESOLUTION with the DSLR camera, then after the stop-motion sequence is completed the high-res. images from the DSLR camera's memory card are transferred to the user's computer and then imported into a new layer in TVPaint (above the previously captured low-res. images from the webcam) , so the final output will be from the high-resolution images .

(don't use this image in the new user manual because I pulled it from the support webpage of another stop-motion application , but this gives the idea
of what I am talking about to show how a webcam can be attached alongside of a DSLR )
.
Last edited by D.T. Nethery on 15 Jul 2013, 15:20, edited 1 time in total.
- D.T. Nethery
- Posts: 4276
- Joined: 27 Sep 2006, 19:19
Re: Mistakes in the user guide
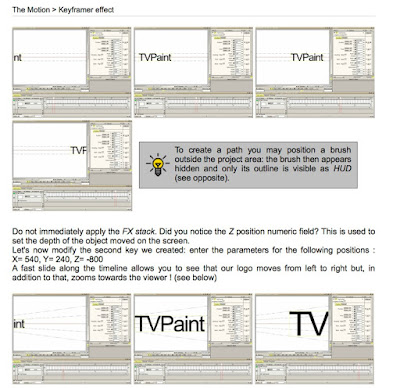
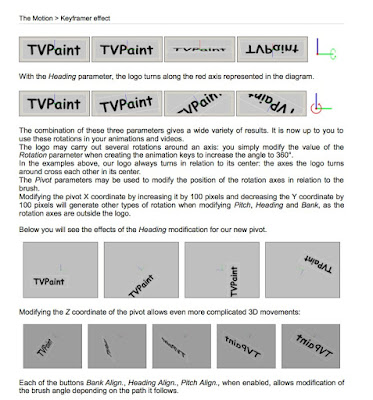
I would say the same about the section in the current user manual describing the use of the KeyFramer Tool in the FX Stack, section 15-9 - through - 15-16 . It's not that the information in that section is mistaken or poorly written, but to the new user (or even a somewhat experienced user) it does not clearly communicate what the KeyFramer Tool is capable of in terms of simulating Camera Movement for ANIMATION (character animation) .
Most of the illustrations in this section about the KeyFramer Tool make it appear to be something used for 'motion graphics' , applicable to animating Text for movie or television titles , but looking over this section of the user manual most new users would not have a clue that the KeyFramer is a tool to use when you have a typical scene where an animated character is walking along with a Background panning behind the character, or if the camera zooms-in on a character from a long-shot to a close-up , or the camera pans up the side of a building and zooms-in to a window .
The impression given in this section of the user manual is that the KeyFramer is mainly a tool for moving text around , or changing the angle, pitch, or bank on still images (page 15-13) which might be the sort of thing one would use for a transitional effect where a part of an image "wipes" or "spins" off to a new image in a title sequence or in a film strip presentation .
 -
- 
So, yes, I realize that moving text is technically 'animation' , but to someone concerned with hand-drawn character animation this section of the user manual does not adequately communicate the function of the KeyFramer for producing camera movement for animated films. (and since many people will have TVPaint Standard Edition , which does not include the simple Camera tool as in TVPaint Pro , the KeyFramer is the main tool they will use to produce camera movement . )
This is the sort of thing I mean: it should show a typical example of a character animating across a scene (a "pan BG") -

And show how the same sort of Camera panning movement is accomplished with the Camera Tool vs. using the KeyFramer Tool.

The user manual should demonstrate a simple zoom-in or zoom-out using the KeyFramer Tool . You could use the same artwork from the Storyboard/Animatic/Camera Tool tutorials to show how to do similar types of camera moves with the KeyFramer Tool .
Or the same artwork shown in the section on the Camera Tool could be used to also illustrate how to produce the same moves using the coordinates in the KeyFramer Tool -
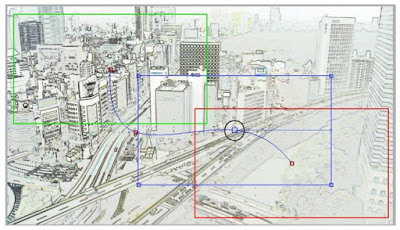
This topic about how to do camera moves comes up on the forum from time to time and I'll usually try to throw on some simple examples like here:
http://forum.tvpaint.com/viewtopic.php? ... 163#p55315
and here:
http://forum.tvpaint.com/viewtopic.php? ... 682#p50391
and here:
http://forum.tvpaint.com/viewtopic.php? ... 727#p50727
But I think this sort of thing really needs to be clearly demonstrated with examples in the user manual . Adding these sort of examples to the section on the KeyFramer Tool would help new users to grasp that this is another tool in TVPaint they may use to simulate camera movement for traditional drawn animation .
For instance a simple "Repeat Pan BG" would be drawn on long paper and scanned in , or drawn paperlessly in an over-sized TVP project window like this :

(blue and red fields showing the start and end positions of the pan ... in this case the two positions are identical , so the BG can seamlessly loop multiple times)
Then a separate TVP project is opened and the KeyFramer Tool used to make the source project Pan BG move :
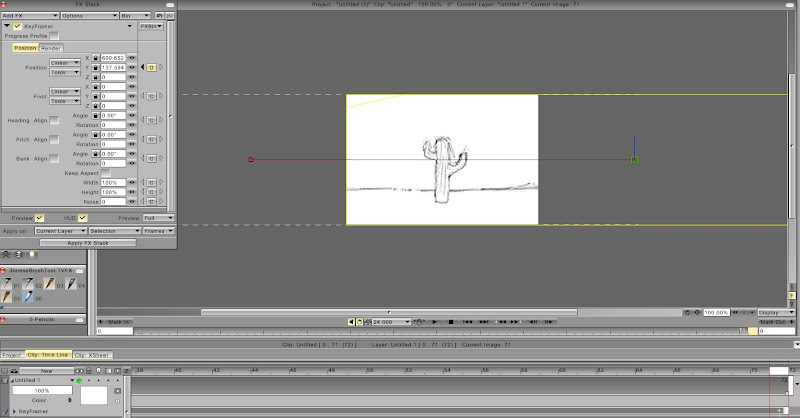
Resulting in this sort of move (which could have a character walking , running, or riding a bicycle in front of the repeating Pan BG ) -
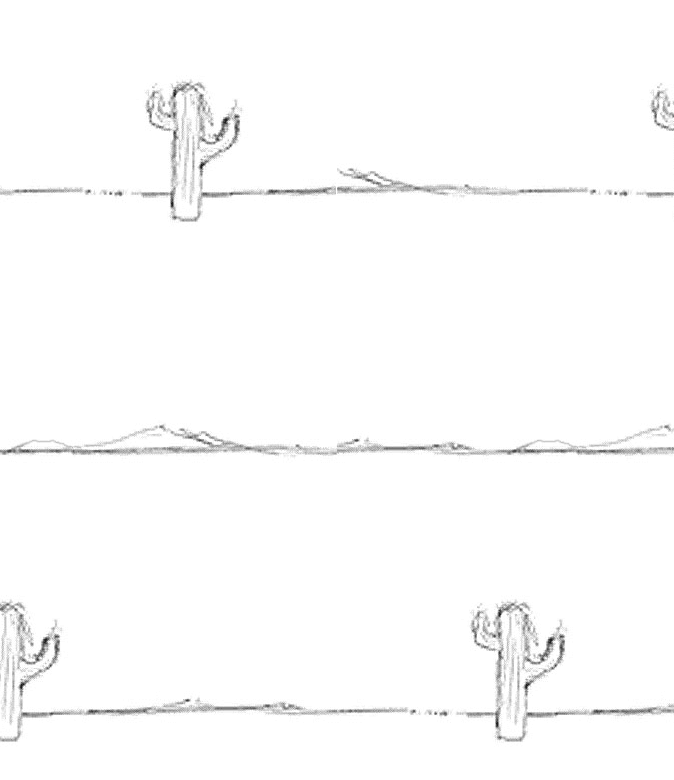
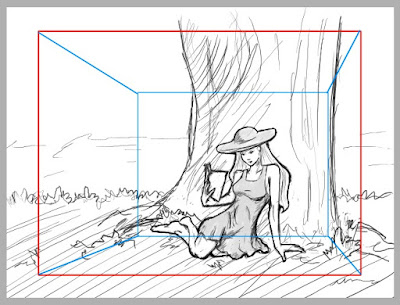
In one of those posts on the forum I made this very quick, crude illustration to help someone on the forum grasp the concept of the KeyFramer being a 3-dimensional "stage" or space , with the BG source layer viewed behind the character through a "window" (or really it's not a window , but the camera viewfinder, right ? ) :
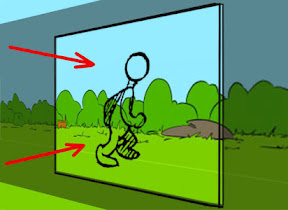

I've used that illustration with students to help them grasp the idea of the KeyFramer , and it's worked. I think this kind of thing helps people "get" the KeyFramer as a camera move tool for animation , not something that is only for spinning/rotating/zooming on Text or logos.
These illustrations I've posted above are cobbled together from various ad hoc tutorials I've posted on this forum or to my online students needing help to understand the KeyFramer tool , so there is no graphic unity to the design ... You would need to come up with some fresh artwork for the user manual to make everything work together as a cohesive whole , which I fully realize is yet another time-consuming task to put on your already long list of tasks , but I strongly feel that these sort of illustrations are needed to fully explain the KeyFramer Tool as applicable to character Animation. (please don't remove the current material about manipulating text/ graphics because that information is useful as far as it goes. But seriously consider augmenting and expanding the section on the KeyFramer Tool)
-------
I think the section on the Multiplane Camera Tool needs revising, too. The material in the user manual is helpful as far as it goes , but the feedback I've received from students is that the user manual material on the Multiplane Camera is somewhat confusing to the new user. Video tutorials would help to explain the Multiplane camera better. In this case it's very helpful for new users to actually see the multiplane camera in action , rather than only reading about it in the manual. I can think of a example when Mark Chong recently helped one of our students understand how to use the Multiplane camera . The student needed to SEE Mark using the tool for it to become clear how to use it. However adding more video content to the Tutorials page is a broader topic for another time ...
.
Most of the illustrations in this section about the KeyFramer Tool make it appear to be something used for 'motion graphics' , applicable to animating Text for movie or television titles , but looking over this section of the user manual most new users would not have a clue that the KeyFramer is a tool to use when you have a typical scene where an animated character is walking along with a Background panning behind the character, or if the camera zooms-in on a character from a long-shot to a close-up , or the camera pans up the side of a building and zooms-in to a window .
The impression given in this section of the user manual is that the KeyFramer is mainly a tool for moving text around , or changing the angle, pitch, or bank on still images (page 15-13) which might be the sort of thing one would use for a transitional effect where a part of an image "wipes" or "spins" off to a new image in a title sequence or in a film strip presentation .

 -
- 
So, yes, I realize that moving text is technically 'animation' , but to someone concerned with hand-drawn character animation this section of the user manual does not adequately communicate the function of the KeyFramer for producing camera movement for animated films. (and since many people will have TVPaint Standard Edition , which does not include the simple Camera tool as in TVPaint Pro , the KeyFramer is the main tool they will use to produce camera movement . )
This is the sort of thing I mean: it should show a typical example of a character animating across a scene (a "pan BG") -

And show how the same sort of Camera panning movement is accomplished with the Camera Tool vs. using the KeyFramer Tool.

The user manual should demonstrate a simple zoom-in or zoom-out using the KeyFramer Tool . You could use the same artwork from the Storyboard/Animatic/Camera Tool tutorials to show how to do similar types of camera moves with the KeyFramer Tool .

Or the same artwork shown in the section on the Camera Tool could be used to also illustrate how to produce the same moves using the coordinates in the KeyFramer Tool -

This topic about how to do camera moves comes up on the forum from time to time and I'll usually try to throw on some simple examples like here:
http://forum.tvpaint.com/viewtopic.php? ... 163#p55315
and here:
http://forum.tvpaint.com/viewtopic.php? ... 682#p50391
and here:
http://forum.tvpaint.com/viewtopic.php? ... 727#p50727
But I think this sort of thing really needs to be clearly demonstrated with examples in the user manual . Adding these sort of examples to the section on the KeyFramer Tool would help new users to grasp that this is another tool in TVPaint they may use to simulate camera movement for traditional drawn animation .
For instance a simple "Repeat Pan BG" would be drawn on long paper and scanned in , or drawn paperlessly in an over-sized TVP project window like this :

(blue and red fields showing the start and end positions of the pan ... in this case the two positions are identical , so the BG can seamlessly loop multiple times)
Then a separate TVP project is opened and the KeyFramer Tool used to make the source project Pan BG move :

Resulting in this sort of move (which could have a character walking , running, or riding a bicycle in front of the repeating Pan BG ) -

In one of those posts on the forum I made this very quick, crude illustration to help someone on the forum grasp the concept of the KeyFramer being a 3-dimensional "stage" or space , with the BG source layer viewed behind the character through a "window" (or really it's not a window , but the camera viewfinder, right ? ) :


I've used that illustration with students to help them grasp the idea of the KeyFramer , and it's worked. I think this kind of thing helps people "get" the KeyFramer as a camera move tool for animation , not something that is only for spinning/rotating/zooming on Text or logos.
These illustrations I've posted above are cobbled together from various ad hoc tutorials I've posted on this forum or to my online students needing help to understand the KeyFramer tool , so there is no graphic unity to the design ... You would need to come up with some fresh artwork for the user manual to make everything work together as a cohesive whole , which I fully realize is yet another time-consuming task to put on your already long list of tasks , but I strongly feel that these sort of illustrations are needed to fully explain the KeyFramer Tool as applicable to character Animation. (please don't remove the current material about manipulating text/ graphics because that information is useful as far as it goes. But seriously consider augmenting and expanding the section on the KeyFramer Tool)
-------
I think the section on the Multiplane Camera Tool needs revising, too. The material in the user manual is helpful as far as it goes , but the feedback I've received from students is that the user manual material on the Multiplane Camera is somewhat confusing to the new user. Video tutorials would help to explain the Multiplane camera better. In this case it's very helpful for new users to actually see the multiplane camera in action , rather than only reading about it in the manual. I can think of a example when Mark Chong recently helped one of our students understand how to use the Multiplane camera . The student needed to SEE Mark using the tool for it to become clear how to use it. However adding more video content to the Tutorials page is a broader topic for another time ...
.
Re: Mistakes in the user guide
I still say the manual lacks a part describing common animation workflows and their equivalent in TVP (like the old Freehand 3 manual which I still keep for its clarity). I'd even go so far and suggest a table with Photoshop ways of doing and their TVP equivalents (like Blender has a way to behave similar to Cinema4D).
TVP 10.0.18 and 11.0 MacPro Quadcore 3GHz 16GB OS 10.6.8 Quicktime 7.6.6
TVP 11.0 and 11.7 MacPro 12core 3GHz 32GB OS 10.11 Quicktime 10.7.3
TVP 11.7 Mac Mini M2pro 32GB OS 13.5
TVP 11.0 and 11.7 MacPro 12core 3GHz 32GB OS 10.11 Quicktime 10.7.3
TVP 11.7 Mac Mini M2pro 32GB OS 13.5
Re: Mistakes in the user guide
We can't rewrite everything now, but anyway feel free to write here what you have found.
Fabrice Debarge
Re: Mistakes in the user guide
Thank you David for this great feedback ! 
@Slowtiger : Well, I'm not fond of the part "how you do with Photoshop / how you will do with TVPaint". First of all, because we didn't used Photoshop for many years. Secondly, PS is upgraded every year (more or less) / and last but not least, you should know that "doing like the others" is not really our way to work
The aim of that topic is to notice the parts in the manual that are unclear or not very well written. We couldn't rewrite it entirely (the re-write of the manual from version 9 to 10 has taken to me 3 months, and I reused a LOT of elements from the user guide of the version 9, written by Fabrice).
- D.T. Nethery
- Posts: 4276
- Joined: 27 Sep 2006, 19:19
Re: Mistakes in the user guide
Section 6-10 of the user manual on using Peg Holes Registration says:
It should be Windows > Tools > Peg-Holes Registration
but this path is incorrect."To use this function, just open the Window > Utilities > Peg-holes registration".
It should be Windows > Tools > Peg-Holes Registration
- D.T. Nethery
- Posts: 4276
- Joined: 27 Sep 2006, 19:19
Re: Mistakes in the user guide
Also in Section 6-4 discussion the Scan Cleaner FX it says:
But I think it would be helpful to actually explain the use of the Scan Cleaner at this point in the manual (with screen captures showing scanned images , Before and After using Scan Cleaner) . Also show screen captures of fine-tuning the Scan Cleaner settings using the Profile editor in spline mode , so that users are aware of how their scanned images may be adjusted. The same information could be repeated in the section on the FX Stack , but some users will simply want to use it to import hand-drawn animation, run the Scan Cleaner and Peg Holes Reg. and that's all they need to know at that point. They may not be inclined to explore the details of the FX stack in Lesson 10 until much later . At this point the new user needs to know how to get their scanned images cleaned and registered to make a pencil test."To obtain this result, use the feature Basic scan cleaner, available in the Image > Modify menu, specially designed to accomplish the two aforementioned operations in a few clicks. You can also use the FX Color > Scan Cleaner, if the parameters of the Basic scan cleaner does not fit to you. FX stack will be discussed in lesson 10."
Re: Mistakes in the user guide
Thanks David !
- D.T. Nethery
- Posts: 4276
- Joined: 27 Sep 2006, 19:19
Re: Mistakes in the user guide
Not a mistake as such , but an odd turn of phrase in English :
User Manual Lesson 1 , page 1-14 under Auto Backup:
A better rendering of this line in English would be:
"Each time you save, the oldest file will be modified, with a new date and hour".
But now that I read it again , I wonder if this is correct ? With Auto Backup isn't the most recent (the newest) version modified when you Save ? (with the older versions being retained in their old form , so it is possible to return to an older , previous version if desired ? ) .
.
User Manual Lesson 1 , page 1-14 under Auto Backup:
Most native English speakers will read "the more ancient file" with the connotation of "ancient" meaning :"Relating to times long past, especially those of the historical period before the fall of the Western Roman Empire (a.d. 476)" http://www.thefreedictionary.com/ancient" onclick="window.open(this.href);return false;"Each time you will save, the more ancient file will be modified, with a new date and hour."
A better rendering of this line in English would be:
"Each time you save, the oldest file will be modified, with a new date and hour".
But now that I read it again , I wonder if this is correct ? With Auto Backup isn't the most recent (the newest) version modified when you Save ? (with the older versions being retained in their old form , so it is possible to return to an older , previous version if desired ? ) .
.
- Peter Wassink
- Posts: 4513
- Joined: 17 Feb 2006, 15:38
- Location: Amsterdam
- Contact:
Re: Mistakes in the user guide
"Each time you save, the previously saved version of the project will be renamed.
The file name of this older file will be extended with the current date and time. "
Peter Wassink - 2D animator
• PC: Win11/64 Pro - AMD Ryzen 9 5900X 12-Core - 64Gb RAM
• laptop: Win10/64 Pro - i7-4600@2.1 GHz - 16Gb RAM
• PC: Win11/64 Pro - AMD Ryzen 9 5900X 12-Core - 64Gb RAM
• laptop: Win10/64 Pro - i7-4600@2.1 GHz - 16Gb RAM
- D.T. Nethery
- Posts: 4276
- Joined: 27 Sep 2006, 19:19
Re: Mistakes in the user guide
Out-of-Pegs function often confuses the new user until they SEE it demonstrated . This really needs a video tutorial .
However, the current explanation of Out-of-Pegs in the User Manual seems to skip a final step . The way it reads now in the User Manual to complete an inbetween is like this:
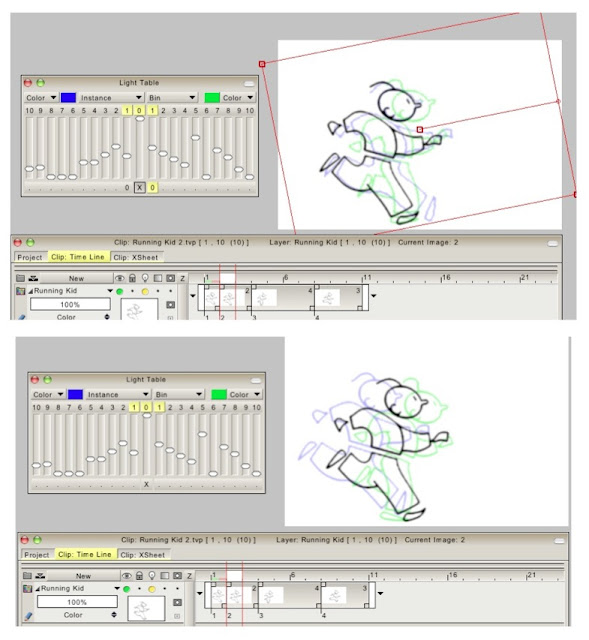
which implies that the animator may complete the new inbetween drawing , then click on X under the current images slider and the drawings will all move into proper position with the new inbetween located half-way between the preceding drawing and the following drawing.
But it does not work like that . After clicking X to move the shifted drawing back into it's proper position there is now an extra step that must be done using the Transform Tool to shift the new inbetween drawing to position it 1/2 way (or 1/4th or 1/3rd, whatever is intended) between the preceding drawing and the following drawing.
The wording and the illustration in the current User Manual make it seem as if all three drawings (preceding drawing , new inbetween , and following drawing) will automatically snap into place when X is clicked.
(by the way: as far as I know , there was never an explanation of how Out-of-Pegs works added to the TVPaint 9.5 user manual or appendix , even though Out-of-Pegs function exists in TVPaint 9.5.21 . Many people still use TVPaint 9.5 , so here again a comprehensive video tutorial showing how Out-of-Pegs works would help. )
.
However, the current explanation of Out-of-Pegs in the User Manual seems to skip a final step . The way it reads now in the User Manual to complete an inbetween is like this:
with this illustration:
"When you moved all your images, you simply have to choose your drawing tool and complete your inbetween. If you want to reset the display, click on on the “X”, under the current image's slider (you can also remove individually the “out-of-pegs” with a right click)."

which implies that the animator may complete the new inbetween drawing , then click on X under the current images slider and the drawings will all move into proper position with the new inbetween located half-way between the preceding drawing and the following drawing.
But it does not work like that . After clicking X to move the shifted drawing back into it's proper position there is now an extra step that must be done using the Transform Tool to shift the new inbetween drawing to position it 1/2 way (or 1/4th or 1/3rd, whatever is intended) between the preceding drawing and the following drawing.
The wording and the illustration in the current User Manual make it seem as if all three drawings (preceding drawing , new inbetween , and following drawing) will automatically snap into place when X is clicked.
(by the way: as far as I know , there was never an explanation of how Out-of-Pegs works added to the TVPaint 9.5 user manual or appendix , even though Out-of-Pegs function exists in TVPaint 9.5.21 . Many people still use TVPaint 9.5 , so here again a comprehensive video tutorial showing how Out-of-Pegs works would help. )
.
- D.T. Nethery
- Posts: 4276
- Joined: 27 Sep 2006, 19:19
Re: Mistakes in the user guide
Under sections on Layers Blending Mode and Alpha Diff Drawing mode in the current user manual there are simple illustrations of a house used to demonstrate those modes.

But buried within a page on the TVPaint website -- "What's New in TVPaint 9" http://www.tvpaint.com/v2/content/artic ... snew90.php" onclick="window.open(this.href);return false; -- (this is from quite some time ago !) there are several very nice illustrations by Hisko Hulsing (the Cow , and a frame from Junkyard) showing how these blending modes are applied to animated character drawings , to get a layered painting or "marker/watercolor"-ish painting effect on the characters. I suggest these illustrations (or similar) be used to demonstrate Layers Blending Modes and Alpha Diff Drawing mode in the user manual . These drawing will catch the eye of the artist and instantly reveal to them the possibilities of TVPaint's different blending modes for painting animated characters that are much more than simple click-and-fill flat cartoon color . This is the sort of thing that TVPaint can do so well that other animation programs can not do , but it is not emphasized enough by the illustrations used in the User Manual , which are fine for a "technical" explanation of the blending modes, but the "little house" illustration is used so much in the manual that the new user's eyes tend to skip over it .
Hisko's demo drawings , from here: http://www.tvpaint.com/v2/content/artic ... snew90.php" onclick="window.open(this.href);return false;


